The iPhone 17 packs powerful features in iOS 26, and screen recording is one of the handiest for capturing gameplay, tutorials, or funny moments. Whether you’re an iPhone 17 owner hunting for quick tricks or troubleshooting glitches, this guide walks you through how to screen record on an iPhone 17 like a pro. No tech headaches—just simple steps to get started today.

Why Screen Record on Your iPhone 17?
Screen recording on iPhone 17 shines for sharing tips, reporting bugs, or saving memories without extra apps. Built into iOS 26’s Control Center, it’s faster and sharper than ever on the iPhone 17’s display.
Apple improved it with better mic audio and quick edits, perfect for your daily tricks. New owners love it for demos; power users dig the hidden options like excluding notifications.
Expect crisp 4K-ready clips stored right in Photos—ideal for social shares or backups.
Step-by-step to Screen Record on iPhone 17
Screen recording on the iPhone 17 uses the built-in Control Center feature, available on iOS 26. Follow these beginner-friendly steps to capture your screen, including options for audio.
Step 1: Add Screen Record to Control Center
By default, it might not show—here’s the quick fix.
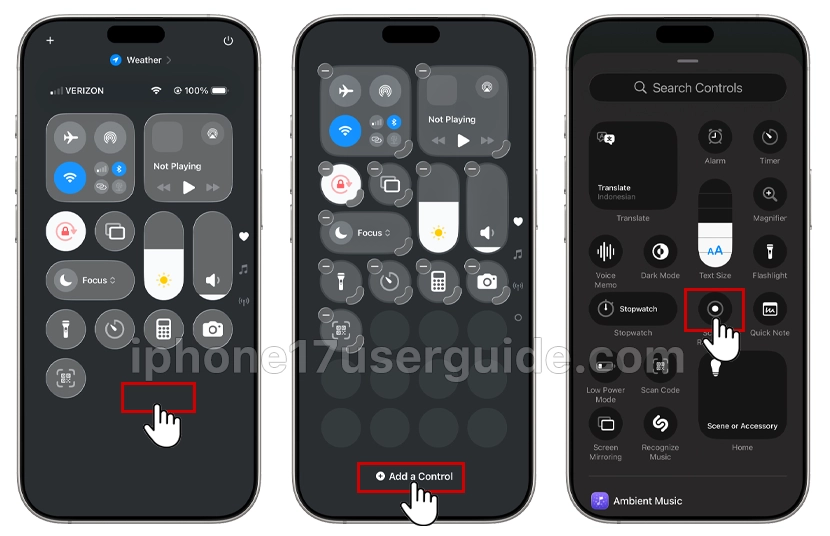
- Swipe down from the top-right corner of the screen to open Control Center.
- Touch and hold the background of the screen, then tap Add a Control.
- In the controls gallery, tap Screen Recording to add it to Control Center.
Note: After you add Screen Recording to Control Center, you don’t need to add it again for future recordings.
Trick: Long-press the icon after adding to set the mic on by default—saves taps!
Step 2: Basic Screen Record on iPhone 17
Ready to roll? Follow these for a simple clip.
- Swipe down to open Control Center.
- Tap the Screen Record icon (circle inside another circle).
- A 3-second countdown starts—tap the screen to begin.

- Do your thing: game, scroll, or app demo.
- Tap the red status bar at the top, then Stop. Your video saves to Photos.
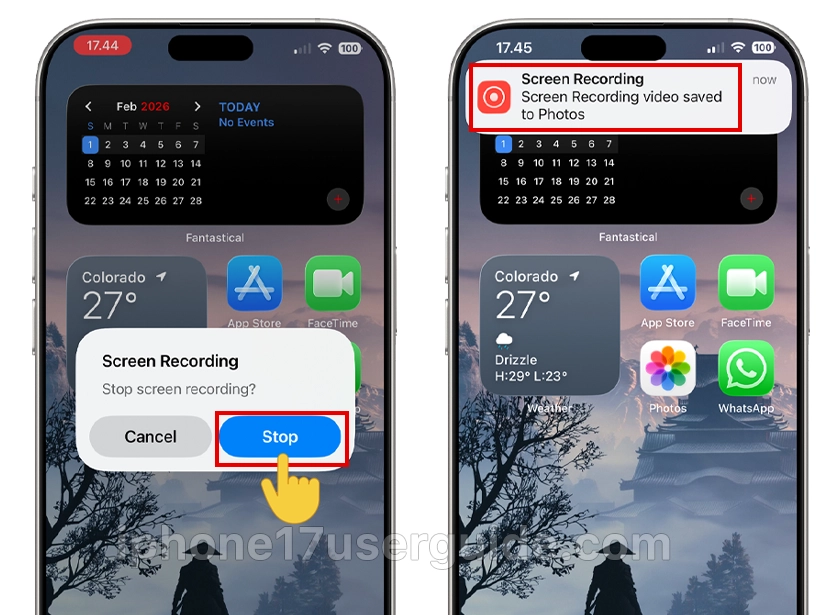
- It captures everything visible, including taps for smooth demos.
Quick win: Records system audio automatically—no extra settings needed on iPhone 17.
Step 3: Screen Record with Sound (Mic + Internal)
Want voiceovers or FaceTime audio? Easy upgrade.
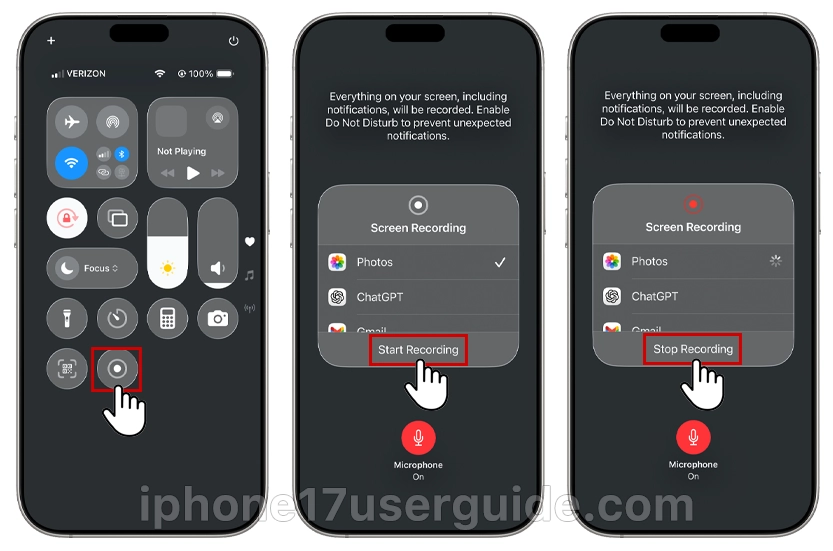
- In Control Center, long-press the Screen Record icon.
- Tap Microphone (turns red when on).
- Hit Start Recording—speak away!
- Stop via the red bar as before.
- Internal app sounds mix with your mic perfectly on iOS 26. Test on TikTok or podcasts for pro results.
iPhone 17 trick: Use Spatial Audio mics for clearer voice in noisy spots—a game-changer for vlogs.
Advanced Tricks for iPhone 17 Owners
Level up your how-to screen record iPhone 17 game with these.
Exclude Notifications
Before starting:
- Long-press Screen Record in Control Center.
- Toggle off Show Banner or swipe to hide alerts.
- Keeps clips clean—no pop-ups ruining your flow.
Record Specific Apps Only
Open the app first, then start recording. For the full home screen, start from there. Pro tip: Lock orientation in Control Center for steady shots.
High-Quality Exports
Post-record, edit in Photos:
- Open clip > Edit.
- Crop, stabilize, or add filters.
- Export at 4K if your iPhone 17 Pro model supports it.
Share directly to YouTube or Reels—optimized for iOS 26.
| Feature | Basic Record | With Mic | Pro Trick |
|---|---|---|---|
| Audio | Internal only YouTube | Internal + Mic YouTube | Spatial Mic on 17 Pro |
| Quality | Up to 1080p | Same | 4K Export |
| Best For | Gameplay | Tutorials | Vlogs YouTube |
| Steps | 1 tap | Long-press |
Troubleshooting Common Issues
Glitches happen—fix them fast.
- No audio? Double-check mic toggle and volume. Restart iPhone 17 if stuck.
- Missing icon? Re-add via Settings (Step 1).
- Storage full? Delete old clips or offload to iCloud.
- Desync video/audio? Update to iOS 26 and avoid low power mode.
Owner trick: Force-quit apps before recording for smoother performance on iPhone 17.
If issues persist, reset Control Center in Settings or check Apple’s support.
Edit and Share Your Screen Recordings
After stopping, thumb the thumbnail preview to jump to editing.
- Trim ends, loop sections, or text overlays.
- AirDrop to Mac or upload to Drive.
- For social: Save to Files first for compression tweaks.
iPhone 17’s A19 chip makes edits lightning-fast—no lag.
iPhone 17 vs. Older Models
Same core steps as iPhone 16, but iPhone 17 adds better low-light audio and longer battery for 30+ min clips. iOS 26 refines tap visibility too.
Perfect upgrade if you’re switching from Android—feels native instantly.
Mastering how to screen record iPhone 17 opens endless tricks: from quick bug reports to viral content. Follow these steps, tweak with the mic and edits, and you’re set—no apps required. Dive in today and capture what matters on your iPhone 17!