Seeing “SOS only” on your iPhone 17 means it’s stuck in emergency mode, limiting you to calls and texts for emergencies while regular data and calls fail. This issue hits many new iPhone 17 owners due to network glitches, SIM problems, or software bugs. Don’t worry, this article will guide you to fix SOS only on iPhone 17 and get back to normal service quickly.

What Causes SOS Only on iPhone 17?
The “SOS only” message shows when your iPhone 17 can’t connect to its cellular network properly. Common triggers include a weak signal in remote areas, carrier outages, or hardware faults like a damaged SIM. On iPhone 17 models, iOS updates or 5G/6G antenna issues can also spark it.
- Network coverage gaps: Traveling or in buildings blocks signals.
- SIM card errors: Loose, dirty, or incompatible SIMs fail to register.
- Software glitches: iOS bugs post-update lock the phone in SOS.
- Carrier-side problems: Outages or account issues block service.
Quick Checks Before Fixes
Start simple to rule out easy issues.
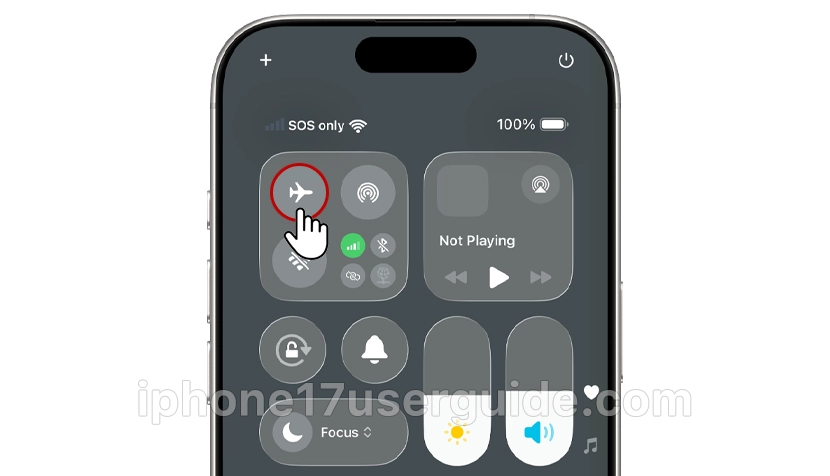
- Toggle Airplane Mode: Swipe down for Control Center, tap the airplane icon for 30 seconds, then turn off. This refreshes connections.
- Check signal strength: Move to an open area. If bars appear, coverage was the culprit.
- Verify carrier status: Visit your provider’s site or app for outages.
Step-by-Step to Fix SOS Only on iPhone 17
There are several simple and effective steps you can take to resolve this and get back to regular call, text, and data usage.
Fix 1: Restart Your iPhone 17
A basic reboot clears temporary glitches.
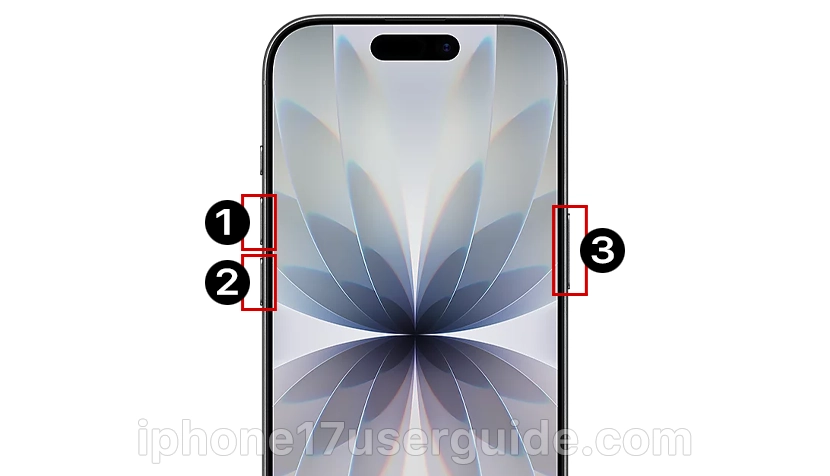
- Press and hold the side button and a volume button until the power-off slider shows.
- Slide to power off, wait 30 seconds.
- Press the side button to restart.
Many users fix SOS this way on iPhone 17.
Fix 2: Remove and Reinsert SIM Card
SIM issues plague iPhone 17 launches.
- Power off your phone.
- Find the SIM tray on the side (use the ejector tool).
- Pop out, clean the SIM with a soft cloth, reinsert firmly.
- Restart and check Settings > Cellular.
Works for 70% of hardware-related SOS cases.
Fix 3: Update Carrier Settings and iOS
Outdated settings cause SOS on new models.
- Go to Settings > General > About—carrier updates auto-install.
- Then Settings > General > Software Update for iOS.
- Install if available, and connect to Wi-Fi.
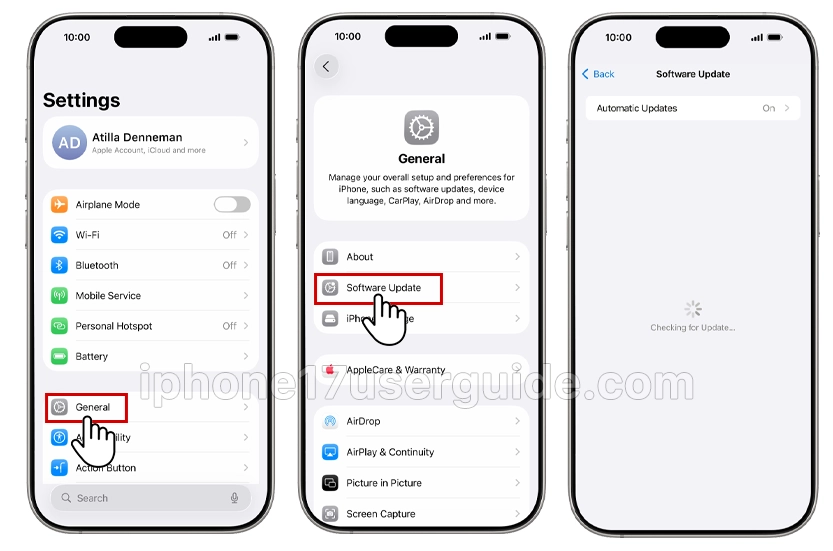
Apple pushes fixes via these for iPhone 17 networks.
Fix 4: Reset Network Settings
Resets Wi-Fi, VPN, and cellular without data loss.

- Settings > General > Transfer or Reset iPhone > Reset > Reset Network Settings.
- Enter passcode, restart.
- Re-enter Wi-Fi passwords.
Ideal for persistent SOS after other steps.
Fix 5: Check Cellular Data Options
Force network selection.
- Settings > Mobile Service > Mobile Data Options > Voice & Data—try LTE.
- Tap Network Selection > turn off Automatic, and pick your carrier.
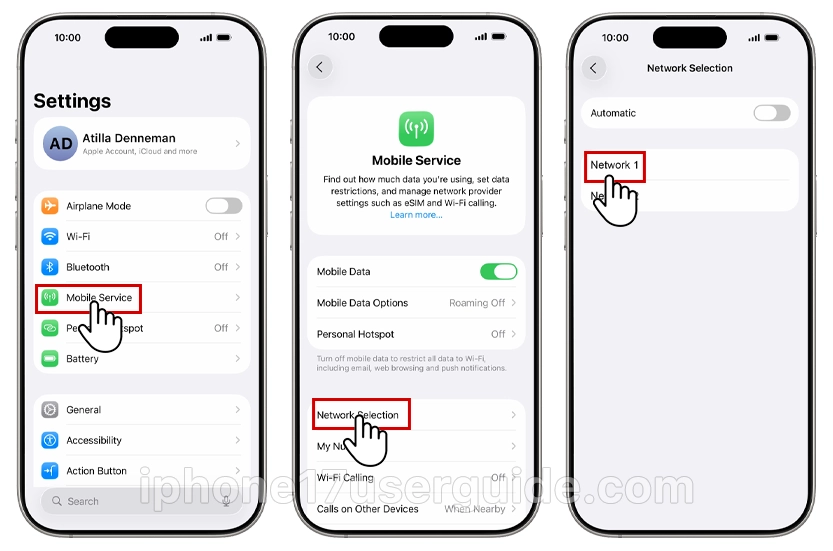
Helps iPhone 17 with dual-SIM or eSIM setups.
Advanced Fixes for Stubborn SOS Only on iPhone 17
Erase All Content and Settings (Last Resort)
- Settings > General > Transfer or Reset iPhone > Erase All Content and Settings.
- Restore from backup after setup.
Contact Carrier or Apple Support
If fixes fail:
- Call the carrier from another phone to check the account/SIM.
- Visit the Apple Store for diagnostics—the iPhone 17 warranty covers hardware.
Preventing SOS Only in the Future
Keep iOS and carrier settings updated. Use Wi-Fi Calling in weak areas (Settings > Cellular > Wi-Fi Calling). Test SIM yearly.
From restarts to resets, these steps fix “SOS only” on iPhone 17 for most users, restoring full service fast. Start with basics and escalate as needed—your iPhone 17 should be back online soon. Stay updated with iOS for fewer issues.
3 thoughts on “Your iPhone 17 Stuck on SOS Only? Here’s How to Resolve It Quickly”